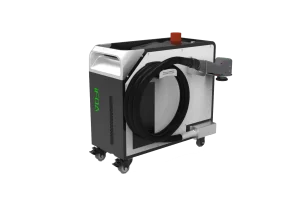
How to Replace the Protective Lens of a Laser Cleaning Machine
(Using STR-iFOA Series as an Example)
The protective lens is a critical optical component in laser cleaning, cutting, and welding equipment. It safeguards the internal focusing lens from high-temperature debris, dust, and contaminants. Proper maintenance and timely replacement are essential to ensure stable cleaning performance and prevent costly optical damage.
1. Common Problems and Troubleshooting
1) Frequent Lens Burn Damage
Possible Causes:
Back-spatter contamination
Insufficient auxiliary gas flow
Recommended Action:
Replace with a high-temperature-resistant protective lens.
2) Red Beam Shift or Damaged Sealing Ring
Possible Causes:
Optical path misalignment
Failed sealing components
Recommended Action:
Recalibrate the optical path and replace the sealing ring.
3) Black Spots on the Lens Surface
Cause:
Dust, oil, or residue contamination
Recommended Action:
Perform thorough cleaning or replace the lens if contamination cannot be removed.
2. Routine Cleaning and Maintenance
Cleaning Procedure
Use lint-free wipes or cotton swabs dipped in high-purity ethanol or acetone.
Gently wipe the surface in a single direction.
Use an air blower to remove dust from the optical cavity and avoid secondary contamination.
Important Precautions
Always wear gloves when handling optical components.
Never touch the optical surface with bare hands.
After cleaning, inspect the lens from multiple angles to ensure there are no scratches or residues.
Equipment Maintenance Recommendations
Regularly check:
Laser head sealing
Gas pipeline cleanliness
Optical path integrity
This helps prevent dust accumulation and improves overall equipment durability.
3. How to Replace the Protective Lens (STR-iFOA Series)
Below is the step-by-step procedure for replacing the protective window of the STR-iFOA series laser cleaning machine.
Step 1 — Remove the Field Lens Retaining Ring
Rotate and detach the retaining ring that secures the protective lens.


Step 2 — Take Out the Used Protective Lens
Carefully remove the old lens.
Do not touch the surface directly.
Use a lint-free wipe when handling the edges.
If dust is present inside the field lens, gently clean with a swab dipped in anhydrous ethanol.


Step 3 — Install the New Protective Lens
Place the new protective lens into the cavity.
Avoid fingerprints or smudges.
Ensure the lens sits flat and secure.

Step 4 — Reattach the Field Lens Retaining Ring
Secure the retaining ring back into position.
Make sure it is tightened evenly, without excessive force.


Contact STRION LASER
📞 +028-85812068
🌐 www.strlaser-en.com
📧 str@strlaser.com